FTS3 - 3D High Resolution Tactile (Pressure) sensor
ANNOUNCEMENT: A ROS package is now available for the FTS/SINGLEX line. Please refer to the Seed Robotics' GIT for instructions and source files.
https://github.com/seedrobotics/ros_fts
Introduction
The FTS3 is parts of the FTS line of High Resolution Tactile Pressure Sensors.
The FTS sensors offer high resolution, low cost, tactile pressure sensors that can be installed on the fingertips of select Seed Robotics Hands.
The sensors can also be purchased stand alone for third-party applications with a stand alone DAQ.
Main advantages:
- High Resolution (0,1g / 1mN)
- High Measurement range, up to 3kg
- 3 axis reading (X,Y,Z) providing the vector vector of the force applied in 3D space
- Default output in
milliNewton - Optional output in
Counts(adimensional) for an even higher resolution when training Neural Networks - Immune to magnetic fields and metallic objects (or any other materials)
- Mechanical shock resistance
- Cost effective
Wiring and Connection
When installed on a Seed Robotics Robot hand or Manipulator
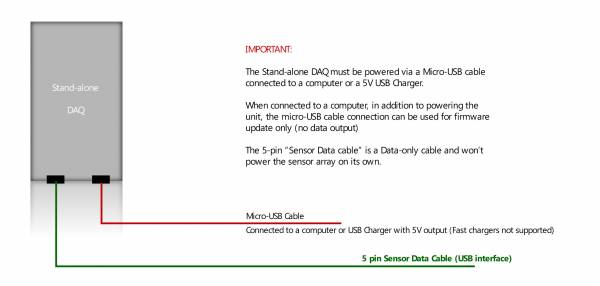
When used stand alone
Usage
When the user connects the Sensor Data cable to the computer, a Serial Port is created on the user's computer.
Under Windows this would be typically COMx, under Linux a /dev/ttyUSBx or /dev/ttyACMx is typically created.
Once the Sensor DAQ and Sensor array are powered (either by powering the Robot Hand or the stand-alone DAQ), the unit immediately starts transmitting data readings in text format (CSV format), at a baud rate of 1 Mbps and a frequency of 50Hz.
This can be later changed using the commands explained below.
VERY IMPORTANT: after power-up it is recommended that the user issues the calibrate command to zero out the readings and establish a baseline. This command is explained further below.
Optimizing performance
The Sensor data cable uses an industry-standard FTDI chip to bridge the Serial connection to the computer's USB port.
It is recommended that users configure the FTDI driver's Latency setting to 1ms.
Setting up the Serial Connection
When the unit first powers up, it starts outputting data at a baud rate of 1Mbps.
The data is sent in ASCII (human readable format), in a comma separated (CSV) format. This data can be immediately directed into a file if the user wishes to do so.
Alternatively, the serial connection can be opened using any programming language or using a Serial Terminal, making it extremely convenient to start using.
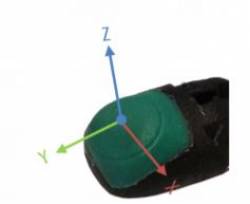
Sensor axis
Sensor axes are defined as follows. This is relevant to understand the output readings that are explained in the next section.
Data Output format
The unit outputs data as text (human readable) in CSV (comma separated format). The format has fixed length and format. It includes a timestamp of when the data was acquired and 3 value coordinates (X, Y, Z vectors) that can be used to calculate both the direction and value (size) of the vector of the force being read on each sensor.
Each line is terminated by a NEWLINE character.
A typical reading output would look like this:
@,377,634,-20,15,-943,-44,212,-804,,,,306,-172,-392,-106,-77,-941,
Upon separating the values of the string by the comma (“,”), the columns are detailed as follows:
Column 1: Line type
@ - means a reading
#OK – Indicates a line with verbose indication after a command is issued. Normally this appears when commands are sent the unit and it responds to them
#ERR – indicates an error during operation. #ERR lines normally appear after sending an invalid user command or at boot, when there is any initialization fault (for example a sensor is connected but no calibration data was supplied to the DAQ)
This column is meant to separate value lines from status lines and simultaneously allow the merging of relevant feedback data in the datastream.
When analyzing data, in a spreadsheet for example, a simple filter on this column would eliminate any undesired lines.
Columns 2 and 3: Timestamp
The timestamp indicates the moment when Data was acquired for this set of results.
Column 2 indicates the seconds and column 3 the milliseconds.
Upon boot column 2 shows the number of seconds since the DAQ was powered on.
Users can synchronize the timestamp to their own reference time, via the command setepoch documented below. Upon issuing that command, the DAQ will update the internal clock and continue counting time from the timestamp provided.
This is particularly useful for synchronizing multimodal datasets.
Next you will receive a sequence of 15 numbers
This corresponds to (3 values per sensor (X, Y, Z)) x 5 fingers. Therefore:
Columns 4, 5, and 6:
These provide the readings for the first sensor (Thumb)
Column 4 is the value X axis,
Column 5 is the value Y axis,
Column 6 is the value Z axis
Columns 7,8, and 9: provide values for second sensor (Index)
Columns 10,11, and 12: provide values for second sensor (Middle finger)
Columns 13,14, and 15: provide values for second sensor (Ring finger)
Columns 16,17, and 18: provide values for second sensor (Little finger)
IMPORTANT: if you have a mixed setup with FTS3 3D sensors and FTS1 1D sensors connecte don the same hand/DAQ, the FTS1 sensors will still output data in this format. However the values for X and Y will always read 0 (zero), because the FTS1 1D sensors, are 1D axis sensors that only measure the Z axis
Empty fields (no value):
If the set of values for a certain sensor is empty, it means the sensor is either not connected or could not be detected upon boot. (for the example above, the third sensor (Middle finger) was disconnected and therefore, no values are sent).
If you reconnect a sensor or wish to force re-enumeration of the connected sensors, use the reset command.
User commands
The connection to the DAQ is established in full duplex mode, which means the user can send commands without disrupting the flow of data
IMPORTANT: certain commands require data output to stop (so that the user can accompany the output of the command). In these cases, data output can be quickly resumed by issuing the resume command.
User commands are sent in text mode (ASCII) directly to the same serial port where the DAQ data is being output.
User commands can be terminated by a NEWLINE for immediate interpretation; if a NEWLINE is not sent, the parser includes a timeout which will attempt to interpret the command after a few milliseconds.
-
help - shows a list of all available commands. Stops data output; Use the resume command to resume data to resume data flow.
resume – resumes sensor data output after it’s been interrupted by a command.
calibrate – zeros the readings and establishes the current readings as the baseline. It is recommended that this command is issued before collecting data.
It is extremely important that users issue a calibrate command after power on.
The readings have typically a very low drift over time as each sensor is calibrated and compensated for multiple external factors.
Nevertheless, whenever necessary, the user may issue the calibrate command to zero out the readings.
setepoch,seconds,milliseconds – sets the DAQ timestamp (columns 2 and 3 of each line of data output by the DAQ).
This can be used to set a real time that is then sent with each record. The purpose is to help synchronize multimodal datasets.
setperiod,milliseconds – sets the data output period, which implicitly sets the output framerate. Valid settings are any number between 20 and 1000 where a period of 20ms corresponds to a frequency of 50Hz and period of 1000ms corresponds to 1Hz
pausedata – pauses the output of data from the DAQ. Use the resume command to resume data output
baudRS422,x - set baud of data output to x*1Mbit (setting is non persistent). After power-on, the default is 1 (for 1Mbit)
Only integers are accepted. A maximum value 3 shall be used.
This setting is non-persistent which means that after a power cycle, the unit reverts to outputting data at the default baud of 1Mbps.
reset - rescans bus for newly connected sensors
reboot - full power cycle for DAQ
ROS Package
A ROS package is available for the FTS sensor line, querying sensor data and publishing it in real time.
All readings are timestamped according to the timing provided by the DAQ ensuring real time recording (and correlation) of sampled data.
The package is available as python source code is expected to be fairly version independent. It is design for ROS 1 at this point.
Please refer to https://github.com/seedrobotics/ros_fts for instructions and source code.
Copyright © 2015-2023 Seed Robotics Ltd


