RH5D/RH7D(discontinued) and RH6D: Unpacking and Mechanical Assembly
NOTE: The RH5D,RH7D(discontinued) and the new RH6D have the same external dimensions and design and use the same internal electronics. For this reason, documentation for both is combined.
The new RH6D combines the best features of both the previous RH5D/RH7D in an optimized package for higher payload and HRI capability.
Package Contents
When unpacking, please check your package contents. The set of spares varies depending on whether your purchased a single hand or a pair.
For a single hand
- 1x RHxD Hands (depending on your order)
For a Pair of Hands
- 2x RHxD hands (1x Left and 1x Right), depending on your order
Note: The Bluetooth interface and Capacitive Pads, if ordered, are installed inside the unit. They will not be visible from the outside.
If your ordered the PC Interface Board + Power and Data Hub + Power Supply
- 1x Power Supply 12V
- 1x USB to Serial converter cable. \\Typically, this will be a special 2-in-1 cable with miniaturized circuitry built inside the USB connector.
- 1x Power and Data Hub board
- 1x or 2x Long connection cable (depending on whether you ordered one unit or a pair or units)
- 1x Short connection cables
The Long and Short connection cables are similar and can be interchanged if the user needs. The Long cable is usually used to connect to the main unit but this is not mandatory; any of the cables can be used.
Assembling the unit on your Robot: Overview
The hand is assembled by means of 4-6 screws located on the back (“wrist”) position.

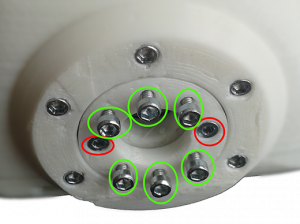
Assembly screws are already pre-assembled (in green). Remove them, including the washers. Pay attention to NOT remove the screws in red or any other screws and they are structural to the hand assembly.
The wrist rotation has approximately 180º of range. Therefore, for correct assembly, rotate central hub in the direction marked in the picture according to the side on which you are assembling: left hand or right hand. ( To rotate the central hub you can use one of the hex keys inserted in the central screws. )
IMPORTANT:
- When tightening screws do not push them in. Screws should be tightened by rotation only.
- Use the included screws for installing your unit, whenever possible. These were selected to provide an appropriate length without interfering with any of the internals. If you need to use screws with different length, our support team can assist you in determining the best length so that they won't interfere with any of the internals.
At this point it is strongly recommended that you test the range of rotation of the gripper by turning them manually or ideally by turning the unit on and moving it in software.
If adjustment is needed remove the assembled screws, rotate gripper to next available position and re-attach screws.
Copyright © 2015-2023 Seed Robotics Ltd